Stream Deck Integration
How To Use Stream Deck with Mira Connect
Stream Deck controllers from Elgato can be used with Aveo System's Mira Connect Software to deliver cost-effective and intuitive user interfaces for AV control applications.

Mira Connect Software is an AV control system that supports thousands of AV products with built-in drivers and equipment simulators and also enables remote monitoring and management of the system. Mira Connect makes it easy to control displays, video switchers, volume, audio mutes, lighting and shades, and more.
The Mira Connect AV control system is configured by simply adding the equipment into a room and choosing the control points in Mira Portal, Mira Connect's management and configuration platform. Mira Connect's user interface is automatically generated and is accessed from a browser without the need for a dedicated touch panel.
Stream Deck controllers connect over a USB connection to a computer that is running the Stream Deck software. That same computer can also run the Mira Connect Software as shown in the following figure, or Mira Connect Software can run on a different computer and communicate with Stream Deck software over a network.

The Mira Connect plugin for Stream Deck connects the Stream Deck to Mira Connect Software via a web socket and maps key presses and dial adjustments to Mira Connect room control commands. The Mira Connect plugin discovers the room's features that were defined in Mira Portal, making it easier for users to configure the Stream Deck controller by simply selecting display names, display sources, camera preset names, channel favorite icons, and more when assigning room control features to keys and dials.
The Stream Deck plugin tracks the state of the Mira Connect system and updates the Stream Deck user interface automatically as mutes, volumes, display sources, and other states change on Mira Connect.
This article shows how to use Mira Connect Software with Stream Deck to create a user interface for controlling AV systems. Mira Connect Software provides the equipment control features and Stream Deck provides a tactile user interface.
Integrating Stream Deck with Mira Connect
To integrate Mira Connect Software with a Stream Deck controller, follow these steps which are detailed in the following sections:
Select and purchase an Elgato Stream Deck controller. Any Stream Deck controller can be used with Mira Connect Software.
Download and install the no-cost Elgato Stream Deck software
Download and install the Mira Connect Software
Create a no-cost Mira Portal account and add an organization, site, and room
Pair Mira Connect Software to the room
Add equipment to the room. Follow the tutorial or our training videos to add the desired equipment and control points to the room.
Download and install our no-cost Mira Connect Stream Deck plugin from the Elgato Marketplace
Assign room controls to the Stream Deck keys and dials. Here is a Stream Deck Plus template to help with planning your Stream Deck user interface.
1. Select and Purchase a Stream Deck Controller
Depending upon your application, you may need a small form factor, or many keys, or a mix of keys and dials. All Stream Deck devices support adding multiple pages of controls, so you are not limited to just the number of buttons on the device. Defining multiple pages allow users to navigate to other pages to access additional room controls. It's also possible to use multiple Stream Deck controllers together, useful if you need more than four dials accessible all the time, for example.

There are companies that make Stream Deck rack mount interfaces such as DeckRack for mounting Stream Deck controllers directly into an equipment rack.
Stream Deck Plus
The Stream Deck Plus offers eight keys and four dials and a touch LCD display. The dials allow easy access to volume control as well as video source selection, channel favorites, lighting and shade controls, and camera preset recall.
For volume control, simply turn the dial to adjust the levels. For display source or camera preset recall, turn the dial to see the sources or presets and press the dial in (or touch the LCD display) to set the particular value.
As with all Stream Deck controllers, additional pages can be added for access to more room controls, so you are not limited to just eight keys.
The Stream Deck Plus is a good choice for general AV applications with volume control or source selections across one or more displays.

Stream Deck XL
The Stream Deck XL has 32 keys which makes it possible to put most controls on one page, making it suitable for power users or mounted in the rack for quick source changes to multiple displays or to assign individual mute controls to keys.
When controlling multiple displays, a Stream Deck folder can be created for each display to allow users to select the display and then assign channel favorites to keys for that particular display or other features as desired.

Stream Deck MK.2
The Stream Deck MK.2 offers three rows of keys of five keys which makes it easier to allocate keys features and also have additional keys to navigate to other UI pages. For example, if you have several displays that you want to control source selections and channel favorites, you could create a page for each display and add source selections and channel favorites for that display on one page along with navigation controls to get to the next display.
Note that Stream Deck folders can also be created where pressing a folder key navigates down and allows you to add new key controls while also being easy to navigate back to the top level key assignment.

Stream Deck Mini
The Stream Deck Mini has a small form factor and six keys that can easily be assigned to source selections or other system features. The small form factor makes it suitable for use in space-constrained applications such as a podium.

Stream Deck Neo
The Stream Deck Neo has a small form factor with slightly smaller keys than the other Stream Deck models and also has a captive USB cable that can't be unplugged from the base. There is a small LCD display that is configurable and touch-sensitive buttons for navigating to additional pages.
The Neo is suitable for applications where a small footprint is required such as on a podium. The form factor could be used for selecting video sources, controlling mute on one or more microphones, controlling the screen blank or freeze on a projector, and even volume up and down for a presenters microphone.

Regardless of the Stream Deck controller selected, the configuration process is the same using the Stream Deck software and the Mira Connect plugin as described in the following sections.
2. Download and Install Stream Deck Software
Navigate to Elgato and download the Stream Deck software and install it on a PC or Mac. Stream Deck software will run as a service in the background.
Mira Connect Software can also run on the same PC (Mac version not available yet) or can run on a different PC than the Stream Deck Software that is on the same network as the computer running the Stream Deck software.
3. Download and Install Mira Connect Software
Download Mira Connect Software and follow the instructions in the Mira Connect Software Quick Install Guide. Mira Connect Software runs on a Windows 10 or newer PC.

See the Mira Connect Software article for more information about Mira Connect Software.
4. Create a Mira Portal Account
Navigate to Mira Portal and create a no-cost Mira Portal account. Mira Portal is the management and configuration platform for Mira Connect.

From Mira Portal create an organization, site, and room by following the tutorial or viewing our training videos.
5. Pair Mira Connect Software to the Room
Pair Mira Connect Software to the room as described in the Mira Connect Software Quick Install Guide. Once paired to the room, Mira Connect software is ready for you to add equipment to the room that you'd like to control.

6. Add Equipment to the Room
Once you have the room defined in Mira Portal equipment to the room by following the tutorial or by watching our training videos.

Select the desired equipment from the list and then add connection information and enable the desired control points.

For more information about how to add equipment to a room in Mira Portal, see the Getting Started with Mira Connect Guide. Note that each family of supported products includes an integration guide with steps for how to configure AV control for Mira Connect.

Important: You must add equipment to the room before you can assign room control features to Stream Deck keys and dials.
When adding equipment, you can choose to simulate the equipment if you don't have the real equipment yet that you'd like to control. Mira Connect Software requires a room license before you will be able to control real equipment. To learn more about room licenses and how to purchase them, see our room license guide.
Note that a room license is not required to use simulated equipment, making it easy to get started with Stream Deck and Mira Connect Software.
Once you've added real or simulated equipment to the room, you can use the remote control link to view the automatically generated user interface and control your room from your browser.
7. Download the Mira Connect Plugin for Stream Deck
The Mira Connect plugin can be downloaded from the Elgato Marketplace and installed on a Windows 10 or newer or Mac computer.
The Mira Connect plugin for Stream Deck makes it easy for users to add room control features to Stream Deck's keys and dials.
Using Aveo Systems' Stream Deck plugin, users can easily control:
Mute and volume on multiple audio channels
Video source selection and display power
Selecting TV tuner channel favorites
Media players and recorders
Dialing and receiving audio and video calls
Dialing into audio and video meetings from calendar invitations
Lighting levels and recall lighting presets
Shades and blinds
Recalling camera presets
And more
8. Add Room Controls to Stream Deck Keys and Dials
Once you've added AV equipment to the room as introduced in Add Equipment to the Room, you are ready to assign room control features to Stream deck keys and dials. See the Stream Deck Plus template when planning the user interface.
Important: You must add equipment to the room in Mira Portal as described in Add Equipment to the Room before Mira Connect Software can control the equipment.
Once equipment has been added to the room in Mira Portal, the Mira Connect plugin for Stream Deck shows all the room control commands that can be assigned to Stream Deck keys and dials.
To add room controls to keys, select the Keys heading on the right column and drag and drop a room control from the Mira Connect list to the desired Stream Deck key or dial as shown in the following figure.

To add room controls to dials, select the Dials heading on the right and drag and drop a room control feature to a dial as shown in the following figure.

Configuring the connection to Mira Connect
Once the first room control has been added to the Stream Deck, you must configure the Mira Connect connection tab as shown in the following figure. The connection tab settings only need to be configured once as all room controls will use the same connection settings.

Stream Deck supports creating a web socket connection to Mira Connect Software in one of three ways:
Local
The Stream Deck software is running on the same computer as Mira Connect Software, so no IP address or API Key is required to use the Mira Connect room control API.
This is the most commonly selected option.
Web Socket
The Stream Deck software is running on a different computer as Mira Connect Software. This requires adding the IP address of the computer running Mira Connect Software and an API Key that you must create for the room in Mira Portal.
Secure Web Socket
The Stream Deck software is running on a different computer as Mira Connect Software and you want to create a secure web socket connection to Mira Connect Software. This requires adding the IP address of the computer running Mira Connect Software and an API Key that you must create for the room in Mira Portal.
If the Stream Deck software is running on the same computer as Mira Connect Software, the recommended option is Local .
All the room controls in the Mira Connect Stream Deck plugin use the same socket connection, so the Mira Connect connection settings only need to be set once.
Adding Room Controls to Stream Deck Keys
As described previously, Mira Connect room controls can be dragged to keys and dials. Some room controls require additional settings to be configured before the control can be used.
To add room controls to dials, see the Adding Room Control to Stream Deck Dials section.
As Stream Deck keys and dials are configured, there can be configuration or setting errors that generate error icons as shown in the following figure.

Network Error
If Mira Connect Software isn't running or the Stream Deck can't connect to the Mira Connect Software, a Network error will appear.
To resolve a network error:
ensure Mira Connect Software service is installed and is running,
check that the IP address of the Mira Connect Software's computer is correct in the Mira Connect tab on any room control assigned in the Stream Deck software,
check that the API key is valid for the desired room if not using the Local connection
confirm that web sockets are enabled for the room in Mira Portal. Local web socket connections are always enabled on Mira Connect Software.
Config Error
If the room in Mira Portal doesn't have a particular feature or the additional settings haven't been configured, Config error icon can appear in the key or dial.
To resolve a config error, finish selecting the values required for the particular control in the Stream Deck Software.
If the room control feature is not part of the room, for example if you are trying to add a control for Assistive Listening, but assistive listening is not part of the room, then add the room control feature to the room in Mira Portal.
Pair Error
If the Mira Connect Software has been unpaired from the room, the Pair error will be shown on the keys and dials.
To resolve a pair error, re-pair the Mira Connect Software to the room by navigating to localhost:8888 in your browser and request a pairing code. Click Pair in the Mira Connect tab in Mira Portal for the desired room as shown in the following figure and enter the pairing code.

Each of the Mira Connect room controls that can be assigned to keys are described in the following sections.
To add navigation controls to get to additional pages, see the Navigation controls built into the Stream Deck software.
Assistive Listening Keys
If your room has Assistive Listening defined as part of your DSP audio configuration, then you can add assistive listening mute or volume controls to Stream Deck keys and add volume and mute controls to a dial.
Once the Assistive Listening feature has been dragged to the Stream Deck key, select the Type of control from the pull down list. Valid options are Mute, Volume Up, and Volume Down depending upon the feature you'd like to assign to the key.

Assistive Listening controls can also be assigned to a dial. See the Assistive Listening Dials section for more information.
Call Current Meeting Keys
If your room has dialing capabilities for audio or video calls, you can dial the current meeting by adding the Call Current Meeting control.
The Early Amount parameter indicates how many minutes before a meeting the handset graphic on the key should turn green. For example, if set to the default value of 5, then the handset graphic will turn green at 5 minutes or less before the current meeting. Otherwise the handset color will be yellow to indicate the meeting is in the future.
Set the Early Amount to -1 to have the handset color always be green.

Once the current meeting has been dialed, the key's graphic will update automatically to be a hangup for the meeting, allowing the same button that launched the call to be used to hang up the call.
Call Preset Keys
Call Presets are a pre-defined audio or video numbers that can be dialed with a single key press.
Select the Call Type to make. Valid values are PSTN, Teams, VoIP, Video, Zoom. Enter the Dial String, and enter any optional Meeting Code information required to join meeting. Meeting Codes are not required.
Only call types that are supported by the equipment that Mira Connect is controlling can be dialed. If a selected call type is not supported by the equipment in the room, the handset icon will be gray and calls will not be able to be dialed.

Pressing the Call Preset key will dial the supported call type, and then the Stream Deck key will update to show a red hangup icon, allowing you to use the same key to hangup the call.
If there is an incoming call that matches the parameters of the call preset, then the key graphics will update to show the incoming call, allowing the user to answer the call using the same key that would be used to dial the call preset. If the call is answered, the icon will show the red handset to allow the user to hang up the call.

You can customize the key label by entering text into the Title field.
Camera Preset Keys
You can assign a camera preset to a key by selecting the Camera Switcher and selecting the name of a camera preset. The camera preset names are defined in Mira Portal as presets are saved for cameras.
For VISCA camera applications, the camera switcher will be called Virtual Camera Switcher. For video conferencing-based systems, the camera switcher will be the name of the video codec.

Camera preset selection can also be assigned to a dial. See the Camera Presets Dials section for more information.
Camera Tracking Keys
For cameras with camera tracking features, you can add a key to control whether camera tracking is enabled or disabled.
Select the Camera Switcher, and then select the desired Camera. The camera name was configured in Mira Portal when the camera was added to the room.

Channel Favorite Keys
Channel favorites can be assigned to Stream Deck keys by selecting the Display, the Source on the display that has TV tuner controls, and the specific Channel number or name associated with the channel favorite in Mira Portal.

The channel favorite image that was uploaded in Mira Portal for a channel favorite is automatically available in the Stream Deck software as shown in the following figure once the channel has been selected.

You can customize the image or the title of the channel favorite. To not show the channel number information overlaid on the channel icon, click the Title field and enter a space character.
Channel favorite selection can also be assigned to a dial. See the Channel Favorites Dials section for more information.
Display Blank / Freeze Keys
Displays and projectors that support Display Blank or Freeze can have those features controlled by Stream Deck keys.
Select the desired display from the Display option and then select the Operation to control: Blank or Freeze.
Once the operation has been selected, the label on the key will update automatically to either Blank or Freeze.

Display Motion Keys
If a display or projector includes display motion controls, then you can assign display motion controls for showing and hiding display or screens to Stream Deck keys.
Select the Display, and then select the Motion control, and then the Control for Hide or Show as defined in Mira Portal when configuring the screen motion controls for the display.
The icon for the key will update automatically depending on the Control selected.

Display Power Keys
The power control for a display or projector can be added to a Stream Deck key. Select the name of the display from the Display field.
The display power icon will appear blue when the display is powered on and white when powered off.

Display Source Keys
Source selection can be added to a Stream Deck key by selecting the desired display from the Display field and then selecting the desired source from the Source field. Note that display sources can also be mapped to a Stream Deck Dial as described in a later section.

Once the Display and Source have been entered, the label on the key will be updated with the source name from Mira Portal. You can change the display or source name in Mira Portal and the key will update automatically in the Stream Deck software.
By default, the selected source icon will appear blue when that source is detected and white otherwise.
You can also customize the source name by entering text in the Title field.

Display source selection can also be assigned to a dial. See the Display Sources Dials section for more information.
Incoming Call Keys
Incoming calls can be answered or rejected by assigning an incoming call control to a Stream Deck key.
Select the Action to take for incoming calls: Answer or Reject.
The handset color will be grayed out until there is an incoming call, at which point the key graphics will be active showing a green handset for answering a call or a red handset for rejecting a call.
If the Show Call Info check box is enabled, the incoming caller ID will appear as part of the key label on the Stream Deck.

Lighting Keys
Lighting controls can be assigned to Stream Deck keys by selecting the Type of control which includes On/Off, Level Down, and Level Up. Next, select the Control which is the name of the lighting control that was added in Mira Portal.

Lighting controls can also be assigned to a dial, making it easy to directly adjust the level and on/off state of the particular control with the dial. See the Lighting Dials section for more information.
Lighting Preset Keys
Lighting presets can be assigned to Stream Deck keys by selecting the desired lighting preset from the Preset field. The preset names are defined in Mira Portal when adding the lighting controls to Mira Connect. Changes to the preset names in Mira Portal will automatically update the key label.
You can also use the Title field to customize the label on the key.

Lighting preset selection can also be assigned to a dial. See the Lighting Presets Dials section for more information.
Media Operation Keys
Media operations can be assigned to Stream Deck keys by selecting the desired display from the Display field, selecting the source from the Source field that has media operations defined, and then selecting the Operation from the list of options defined for that particular source on the display.
Depending upon the Operation chosen, the icon and label for the key will change.

Overflow Room Keys
Mute and volume controls of Overflow rooms defined in Mira Portal can be assigned to Stream Deck keys by selecting the Type of control including Mute, Volume Down, or Volume Up, and then selecting the particular Room to control.
The room names correspond to the labels added in Mira Portal when defining the Overflow rooms.

Overflow room mute and volume controls may also be assigned to a Stream Deck Dial. See the Overflow Room Dials section for more details.
Room Mute Keys
The overall mute of the system can be assigned to a Stream Deck by dragging the Room Mute control to a key. There are no other settings that need to be configured to control mute.
Room Mute is configured in Mira Portal by enabling a room mute control on one or more devices such as DSP audio devices, array microphones, and select video switchers that include audio processing.

Room Off Keys
The room power off feature can be enabled in the Site settings in Mira Portal. If the Room Power Off feature as been enabled in the Mira Portal Site settings, then the Room Power Off room control can be assigned to a Stream Deck key.
Room Power Off will turn off all displays, reset the room volume, mute all sound reinforcement and overflow rooms, hang up any active calls, and set the mute state to either muted or unmuted depending up on the settings configured for Site.
There are no other Stream Deck settings that need to be configured to control room power off.

Room Volume Keys
The room volume of the system can be assigned to a Stream Deck key. Select the Type of the control to assign to the key. Valid options are Volume Down and Volume Up.

Note that the room volume can also be assigned to a dial, making it easier to adjust room volume if your Stream Deck supports dials. See the Room Volume Dials section in the Dial section for more information.
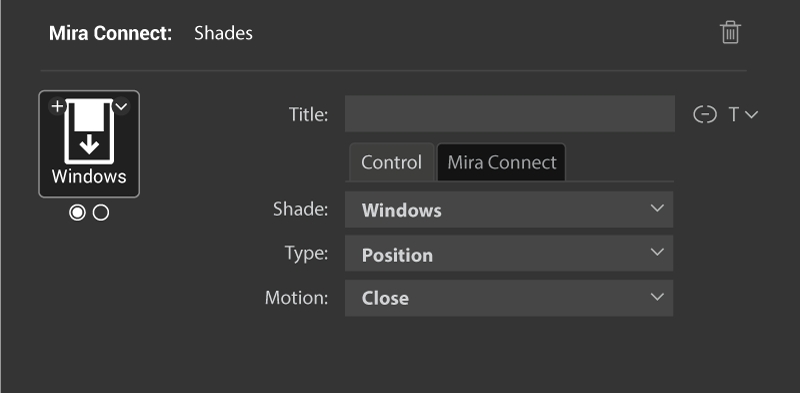
Shades Keys
Shade positions can be assigned to Stream Deck keys if Shades controls have been added to the room in Mira Portal.
Select the Shade name from the list of names, the Type of control including Position and Tilt if those controls have been defined in Mira Portal, and the Motion associated with the Type of control.
Valid Motion options include Decrease, Increase for tilt controls, and Open and Close for position controls.
The key graphics and label will update based on the Type and Motion selected.
Shade Preset Keys
Shade presets can be recalled by Stream Deck keys. Select the Preset from the list of presets that have been defined in Mira Portal for this room.

Shade presets can also be assigned to a dial. See the Shade Presets Dials section for more information.
Sound Reinforcement Keys
Mute and volume controls of Sound Reinforcement zones defined in Mira Portal can be assigned to Stream Deck keys by selecting the Type of control including Mute, Volume Down, or Volume Up, and then selecting the particular Zone to control.
The zone names correspond to the labels added in Mira Portal when defining the Sound Reinforcement controls.

Sound reinforcement volume and mutes can also be assigned to a dial. See the Sound Reinforcement Dials section for more information.
Adding Mira Connect Room Controls to Stream Deck Dials
For Stream Deck controllers with dials, it's easy to assign the features to dials as described in the next sections.
Dials make it easy to change values when there are multiple possible values, such as adjusting volume or choosing a display source or a camera preset.
Assistive Listening Dials
Assistive listening volume and mute control can be assigned to a dial. Enter the desired Increment and whether the Units should be in dB or % (percent of full scale) as shown on the Stream Deck.
Turning the dial will adjust the volume while pressing the dial or touching the display above the dial will toggle the mute state of the Assistive Listening control.

Camera Presets Dials
Camera presets can be assigned to a dial by selecting the desired Camera Switcher.
The preset names are defined in Mira Portal when adding the camera or video codec to the room.
Turning the dial will show different preset names and icons and then pressing the dial or the display above the dial will select the preset. Note that if the dial is turned, but a preset is not selected within 3 seconds, then the last selected camera preset will be shown as the value of the dial.

Channel Favorites Dials
Channel favorite selection can be assigned to a dial by selecting the desired Display from the list of displays controlled and then selecting the Source which has channel favorites defined.
The display and source names are configured in Mira Portal and the channel favorites are defined as part of the TV tuner.
Turning the dial will show different channel favorites associated with that source. Pressing the dial or the touching the screen above the dial will select the selected channel favorite. Note that if the dial is turned, but a channel favorite is not selected within 3 seconds, then the last selected channel favorite will be shown as the value of the dial.
The selected channel favorite will be shown as the display name followed by ':' and then channel favorite name or channel number. Best practice is to keep the display name short.

Display Sources Dials
Display source selection can be assigned to a dial by selecting the desired Display from the list of displays controlled in the room.
The display source names are configured in Mira Portal for the display or video switcher.
Turning the dial will show different source names and then pressing the dial or the touching the screen above the dial will select the selected source. Note that if the dial is turned, but a source is not selected within 3 seconds, then the last selected source will be shown as the value of the dial.
The selected source name will include the Display name followed by ':' and then source name. Best practice is to keep the display and source names short.

Lighting Dials
Lighting levels can be assigned to a dial by selecting the desired Control from the list of lighting controls defined in the room. Lighting levels are adjusted from 0 to 100. You can also select the increment for lighting adjustment. The default increment is 2.
Turning the dial will immediately adjust the level of the selected lighting control. Pressing the dial or the screen above the dial will toggle the on/off state of the lighting control.

Lighting Presets Dials
Lighting presets that have been added to a room in Mira Portal can be assigned to a dial.
Lighting preset names are configured in Mira Portal when adding the lighting preset to the room.
Turning the dial will show different lighting presets and then pressing the dial or the screen above the dial will select the lighting preset. Note that if the dial is turned, but a lighting preset is not selected within 3 seconds, then the last selected lighting preset will be shown as the value of the dial.

Overflow Room Dials
Overflow room volume and mute control can be assigned to a dial. Select the desired Room from the list and enter the desired Increment and whether the Units should be in dB or % (percent of full scale).
Turning the dial will adjust the volume while pressing the dial or touching the screen above the dial will toggle the mute state of the overflow room control.

Room Volume Dials
The overall room volume can be assigned to a dial. Enter the desired Increment and whether the Units should be in dB or % (percent of full scale).
Turning the dial will adjust the room volume.

Shade Presets Dials
Shade presets that have been added to a room in Mira Portal can be assigned to a Stream Deck dial.
The shade preset names are configured in Mira Portal when defining shade presets.
Turning the dial will show different shade presets and then pressing the dial or the screen above the dial will select the shade preset. Note that if the dial is turned, but a shade preset is not selected within 3 seconds, then the last selected shade preset will be shown as the value of the dial.

Sound Reinforcement Dials
Sound reinforcement volume and mute control can be assigned to a dial. Select the desired Zone from the list and enter the desired Increment and whether the Units should be in dB or % (percent of full scale).
Turning the dial will adjust the zone volume while pressing the dial or touching the screen above the dial will toggle the mute state of the Sound Reinforcement control.

Summary
Once controls have been assigned to keys and dials, the finished Stream Deck can look like the following where the dials are used for room volume, lighting level, voice lift, and source selection while the keys are used for mute, channel favorites, shade controls, dialing into the next meeting, and room power off.

The Mira Connect plugin for Stream Deck combined with Mira Connect Software makes it easy to transform any Stream Deck controller into a full AV control system capable of controlling thousands of devices supported by Mira Connect. Stream Deck controllers can complement Mira Connect's built-in browser-based user interface or can be used stand-alone as the primary user interface. Mira Connect's browser interface is always available for remote management and control of the system, making it easy to manage many AV systems from one location.
With Mira Connect Software you can use our built-in equipment simulators to build a user interface and test it with Stream Deck before purchasing any AV equipment. Stream Deck key presses and dial adjustments will update the simulated equipment and those changes can be viewed in real-time by using the remote control UI available in your browser.
Stream Deck's configuration software makes it easy to personalize the name and key graphics with custom icons or labels. Each Stream Deck supports multiple pages of commands, allowing users to navigate to additional pages for more controls. Multiple Stream Deck controllers can also be used together, providing additional user interface keys or dials for any system.
To learn more about Mira Connect, visit AveoSystems.com.